English | 繁體中文
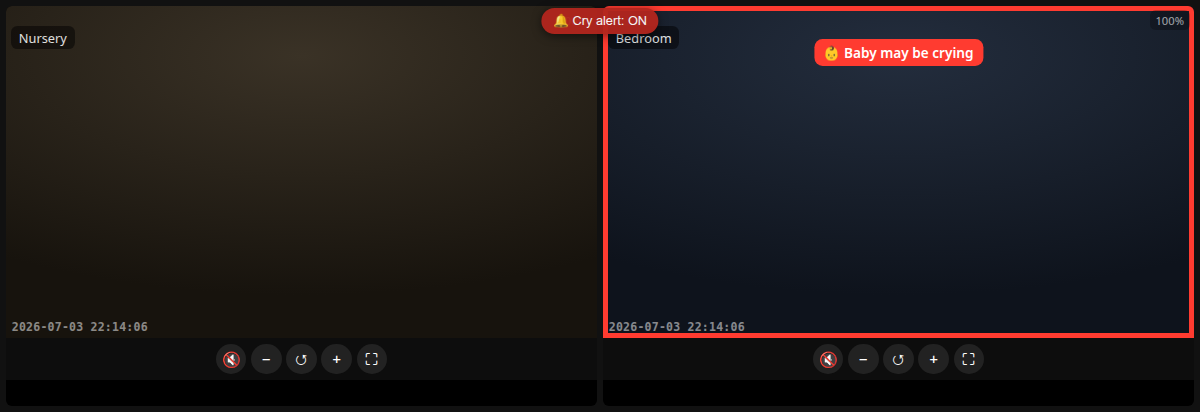
Grid view with the cry alert firing on the Bedroom camera (demo — placeholder feeds).
A private, self-hosted baby monitor that actually knows the difference between crying and just being loud. Camera feeds stream to your phone over WebRTC — nothing touches a vendor cloud — and a small AI model pushes an alert only when it hears a real baby cry (not the vacuum, the TV, or you talking).
Two small pieces:
viewer/— a dependency-free web viewer: multi-camera grid, tap-to-expand, pinch-zoom, mobile portrait feed, and a startup spinner. Talks to go2rtc via WebRTC.cry-detector/— a server-side classifier that runs Google's YAMNet (AudioSet) on short audio clips and pushes a ntfy notification when it detects crying. Runs on CPU. No GPU required.
Why
Off-the-shelf monitor apps round-trip through the vendor's cloud — laggy, and I'd rather my kid's nursery feed not live on someone else's server. And the "smart" alerts are usually just a loudness threshold, so they fire on everything loud. This fixes both: fully self-hosted, and it classifies the sound instead of measuring volume.
Architecture
  IP cameras ──RTSP──> go2rtc ──WebRTC──> browser viewer (phone/desktop, over VPN)
                          │
                          └──RTSP(audio)──> cry-detector ──> YAMNet ──> ntfy push
                                            (short 16kHz clips)         (phone asleep OK)
- go2rtc is the hub: it pulls RTSP from the cameras and re-serves WebRTC to the browser (WebRTC gives sub-second latency and plays the cameras' PCMA audio).
- The viewer is static HTML/JS — host it anywhere (go2rtc can serve it, or any web server).
- The cry-detector pulls audio-only from go2rtc, classifies it, and posts to ntfy.
What you need
- One or more RTSP/ONVIF cameras (most expose a main + sub stream). The stream you view must be H.264 — browsers can't play H.265/HEVC over WebRTC.
- go2rtc (Docker).
- ntfy for push (self-hosted or ntfy.sh), and the ntfy app on your phone.
- Docker for the cry detector.
- Optional — remote access: a VPN (Tailscale is easiest, or WireGuard) only if you want to watch the live video while away from home. Not needed for cry alerts, and never port-forward these unauthenticated ports to the internet (see SECURITY.md).
Minimal setup (no VPN, no Frigate)
You do not need Frigate (a separate NVR) or a VPN to use this. The only hard requirements are cameras + go2rtc + Docker + ntfy.
What works where:
| Where you are | Self-hosted ntfy (Compose default) | Public ntfy.sh |
|---|---|---|
| At home (same Wi-Fi) — live video + alerts | ✅ no VPN | ✅ no VPN |
| Away — cry alerts | 🔒 needs VPN | ✅ no VPN |
| Away — live video | 🔒 needs VPN | 🔒 needs VPN |
To watch live video while away (or to get self-hosted alerts remotely), add a VPN — see the Remote access (Tailscale) section below.
- At home (same Wi-Fi): just open
http://<server-ip>:1985/multi.html— no VPN. - Away from home: a phone on cellular / other Wi-Fi cannot reach your home network by default (it's behind NAT/firewall). To watch live video remotely, add Tailscale (install on the server + phone, log into the same account — ~5 min). Do not port-forward go2rtc to the internet; it has no authentication.
- Cry alerts — depends on your ntfy: with the public ntfy.sh
(
NTFY_URL=https://ntfy.sh/<topic>), pushes reach your phone anywhere, no VPN. With a self-hosted ntfy (the Compose default, kept on your LAN) your phone must be able to reach it — on home Wi-Fi or on the VPN — to receive alerts while away.
ntfy can be the public ntfy.sh (pick a hard-to-guess topic — zero setup) or self-hosted.
Quick start (Docker Compose)
Brings up the whole stack — go2rtc, the viewer, the cry detector, and ntfy:
cp examples/go2rtc.example.yaml go2rtc.yaml   # add your cameras (IPs + credentials)
cp .env.example .env                          # set your ntfy topic, cameras, tuning
docker compose up -d --build
Then open http://<server-ip>:1985/multi.html?cams=cam1,cam2&labels=Nursery,Bedroom
and subscribe to your topic in the ntfy app. That's it — only two files to edit
(go2rtc.yaml for your cameras, .env for your ntfy topic).
- Prefer zero-setup push? Delete the
ntfyservice indocker-compose.ymland setNTFY_URL=https://ntfy.sh/<your-unique-topic>in.env. - Want to run the pieces by hand instead? See the manual steps below.
Running on macOS / Windows (Docker Desktop)
This stack is built for a Linux host (a NAS, mini-PC, an old laptop on Linux, a Pi,
or a VPS) — that's what you'd run a 24/7 monitor on. On Docker Desktop (macOS /
Windows) Docker runs inside a Linux VM, so network_mode: host refers to that VM, not
your computer. The cry detector, push, and the viewer page all work fine — only the
WebRTC live video needs a tweak, because host networking + auto ICE candidates don't
reach the browser. Two options:
A. (easiest) Enable Docker Desktop host networking. Recent Docker Desktop has
Settings → Resources → Network → Enable host networking (beta). Turn it on and the
default docker-compose.yml may work as-is.
B. Use published ports + a WebRTC candidate:
- In
docker-compose.yml, removenetwork_mode: hostfrom bothgo2rtcandcry-detector, and givego2rtcpublished ports:go2rtc: image: alexxit/go2rtc:latest ports: ["1984:1984", "8554:8554", "8555:8555/tcp", "8555:8555/udp"] volumes: - ./go2rtc.yaml:/config/go2rtc.yaml:ro - In
go2rtc.yaml, advertise your computer's LAN IP so the browser can reach WebRTC:webrtc: listen: ":8555" candidates: - <YOUR_LAN_IP>:8555 # e.g. 192.168.1.50:8555 - In
.env, point the detector at the service names instead of localhost:GO2RTC_RTSP=rtsp://go2rtc:8554 NTFY_URL=http://ntfy/<your-topic>
On Linux none of this is needed — host networking handles it, which is why it's the default. For a long-running monitor, a small Linux box is the smoothest option.
Setup (manual, without Compose)
1. go2rtc + cameras
cp examples/go2rtc.example.yaml go2rtc.yaml   # edit: your camera IPs + credentials
# run go2rtc (Docker) pointing at go2rtc.yaml — see go2rtc docs
Name your streams cam1, cam1_hd, cam2, … (or anything — just match the viewer/
detector config).
2. Viewer
Serve viewer/ from any web server (or point go2rtc's static dir at it). Then open:
http://<host>:1985/multi.html?cams=cam1,cam2&labels=Nursery,Bedroom
- Tap a tile (⛶) to expand it and switch to its HD stream; ✕ to go back.
- Pinch/scroll to zoom, drag to pan, 🔔 toggles a lightweight in-browser cry flash.
- Defaults (streams/labels, and the grid→HD map) are near the top of
multi.html.
index.html is a single-camera version: index.html?src=cam1.
3. Cry detector
cp .env.example .env        # edit NTFY_URL, GO2RTC_RTSP, CAMS, …
set -a; . ./.env; set +a    # load it
cd cry-detector && ./run.sh # builds the image and starts the container
docker logs -f baby-cry-detector
On the phone: install the ntfy app, point it at your server, and subscribe to
the topic in NTFY_URL. Alerts arrive even with the phone asleep.
Remote access (optional — Tailscale, ~5 min)
Everything above works on your home Wi-Fi with no VPN. To watch the live video while away from home, put the server and your phone on the same private network with Tailscale (WireGuard under the hood, but zero-config):
- On the server — install and bring it up:
Note its Tailscale address (curl -fsSL https://tailscale.com/install.sh | sh sudo tailscale up100.x.y.z, or a MagicDNS name likemyserver). - On your phone — install the Tailscale app and log in with the same account.
- From anywhere, open
http://<tailscale-address>:1985/multi.html. - (Recommended) set
CRY_CLICK_URLto that Tailscale address, so tapping a cry notification opens the camera even when you're away.
Do not port-forward go2rtc to the internet — it has no authentication. Keeping it behind Tailscale (or WireGuard) is what makes remote access safe. Prefer self-hosted WireGuard? Same idea, more setup — out of scope here.
Tuning
Watch live classifications with CRY_LOG=1 (docker logs -f baby-cry-detector):
[Nursery] cry=0.00 rms=-72dB top='(silence)' streak=0
[Bedroom] cry=1.00 rms=-25dB top='Crying, sobbing' streak=2   -> push!
| var | default | meaning |
|---|---|---|
CRY_PROB |
0.4 |
cry probability 0–1 to trigger. Raise if false alarms, lower if it misses. |
CRY_SUSTAIN_SAMPLES |
2 |
consecutive cry samples before alerting |
CRY_COOLDOWN |
60 |
min seconds between alerts |
CRY_RMS_GATE_DB |
-60 |
skip the model below this loudness (silence) |
CRY_SAMPLE_SEC |
2.0 |
audio seconds per sample |
In my testing, real baby cries score 0.5–1.0; speech peaks around 0.27; and cough / clap / dog / laughing / alarm — and a vacuum cleaner (the loudest sound of the lot) — all score ~0.00. That's the whole point: loud ≠ crying.
Hardware
The cry detector is CPU-only (CPU-only TensorFlow) — a NUC or NAS handles it fine.
A GPU is only useful if you separately transcode a 4K H.265 camera down to H.264 for
the browser (out of scope here — see go2rtc's ffmpeg: source or a mediamtx + NVENC
relay).
Security
Please read SECURITY.md. Short version: never commit secrets
(camera passwords, .conf/.key, tokens, DBs — all gitignored), keep real config
local (go2rtc.yaml, .env), and reach everything over a VPN, not a port-forward.
Notes
Built as a weekend project, largely with Claude Code — including the WebRTC race-condition debugging and wiring up the audio model. Uses Google's YAMNet.
Comments