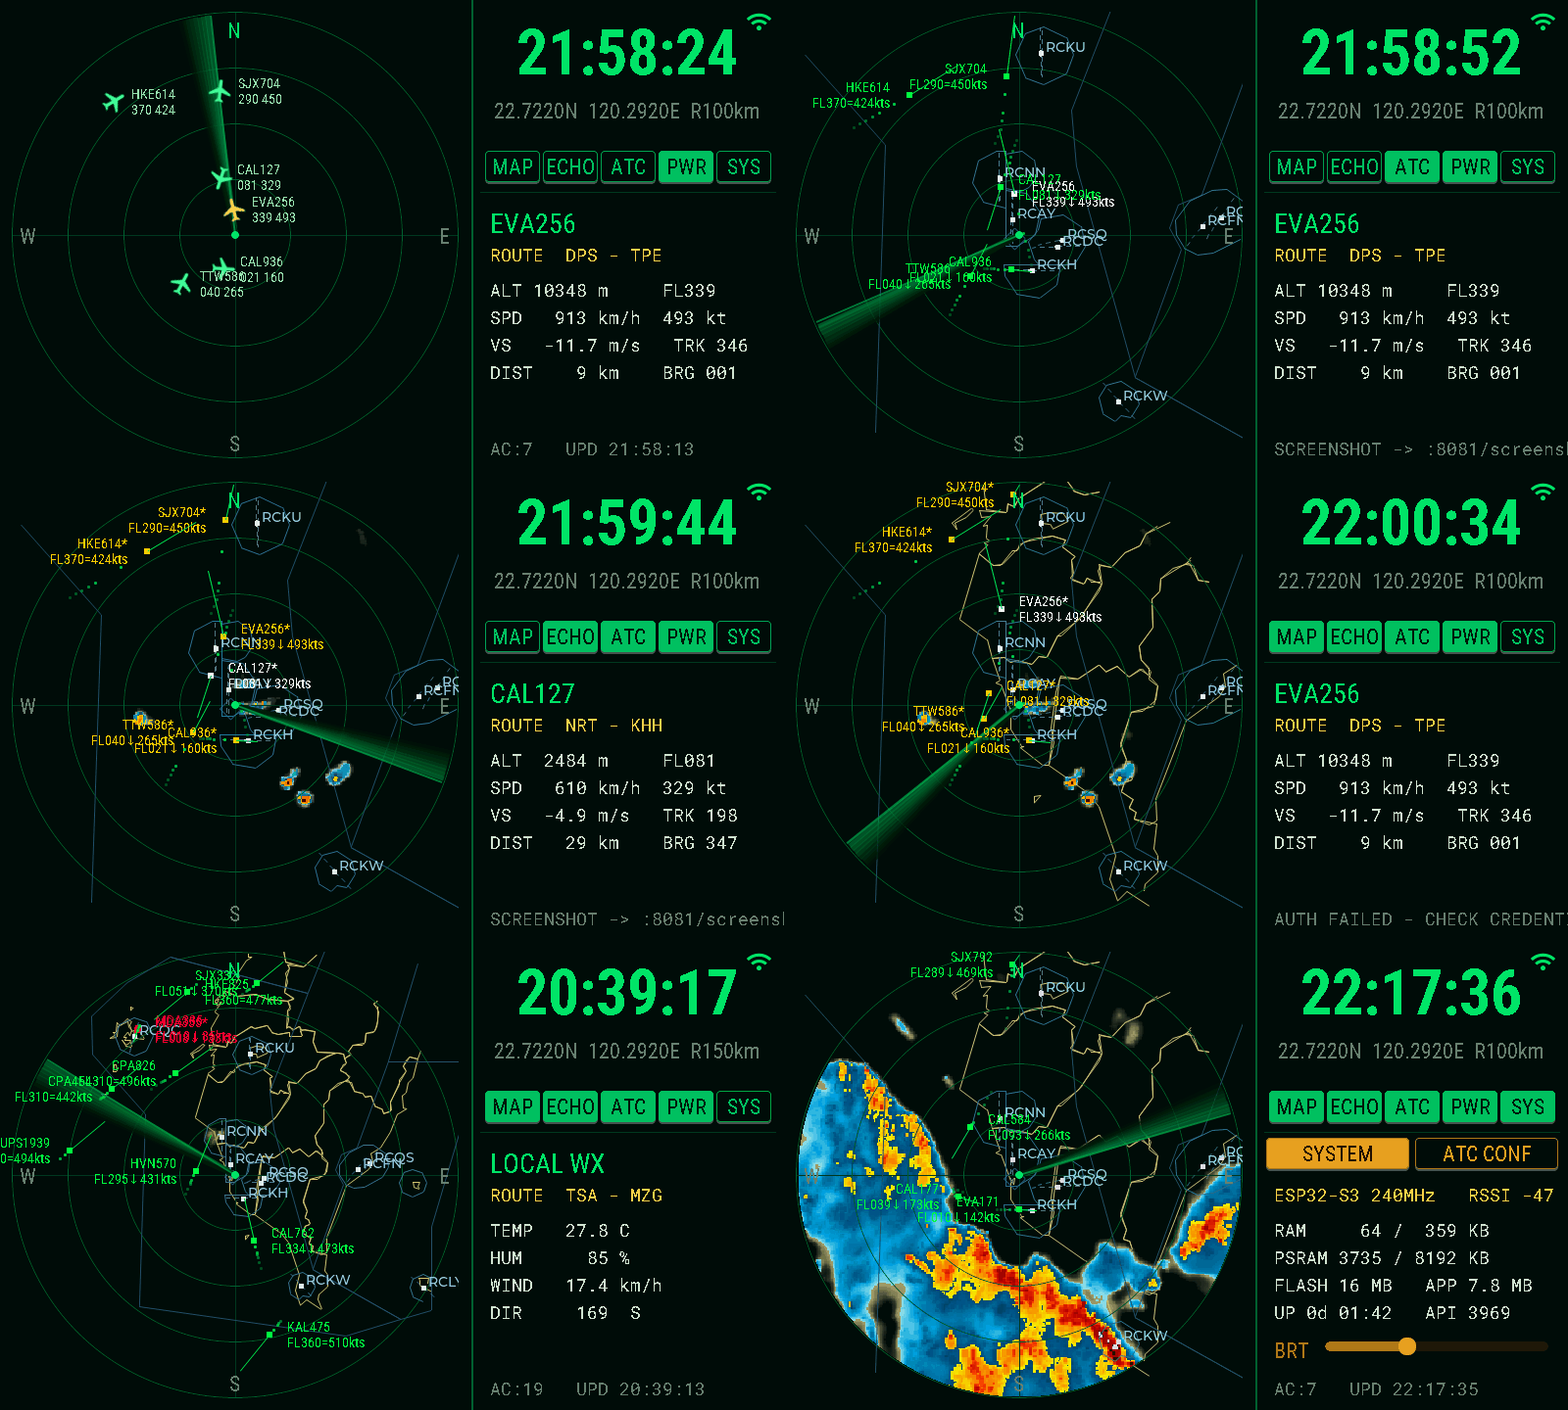
A desktop flight-radar ornament for the ESP32-S3 5" 800×480 RGB touch panel, built entirely with ESPHome. It shows live aircraft over your location on an ATC-style radar scope, and doubles as a weather-radar display, a Home Assistant panel, and an alarm clock.
一款以 ESPHome 打造的桌面航班雷達擺件,執行於 ESP32-S3 5 吋 800×480 RGB 觸控屏。以航管雷達風格顯示你所在位置上空的即時航班,同時也是氣象雷達顯示器、Home Assistant 控制面板與鬧鐘。
Inspired by AnthonySturdy/micro-radar — reimagined for a large landscape touch display with a much larger feature set.
📸 Demo / 畫面
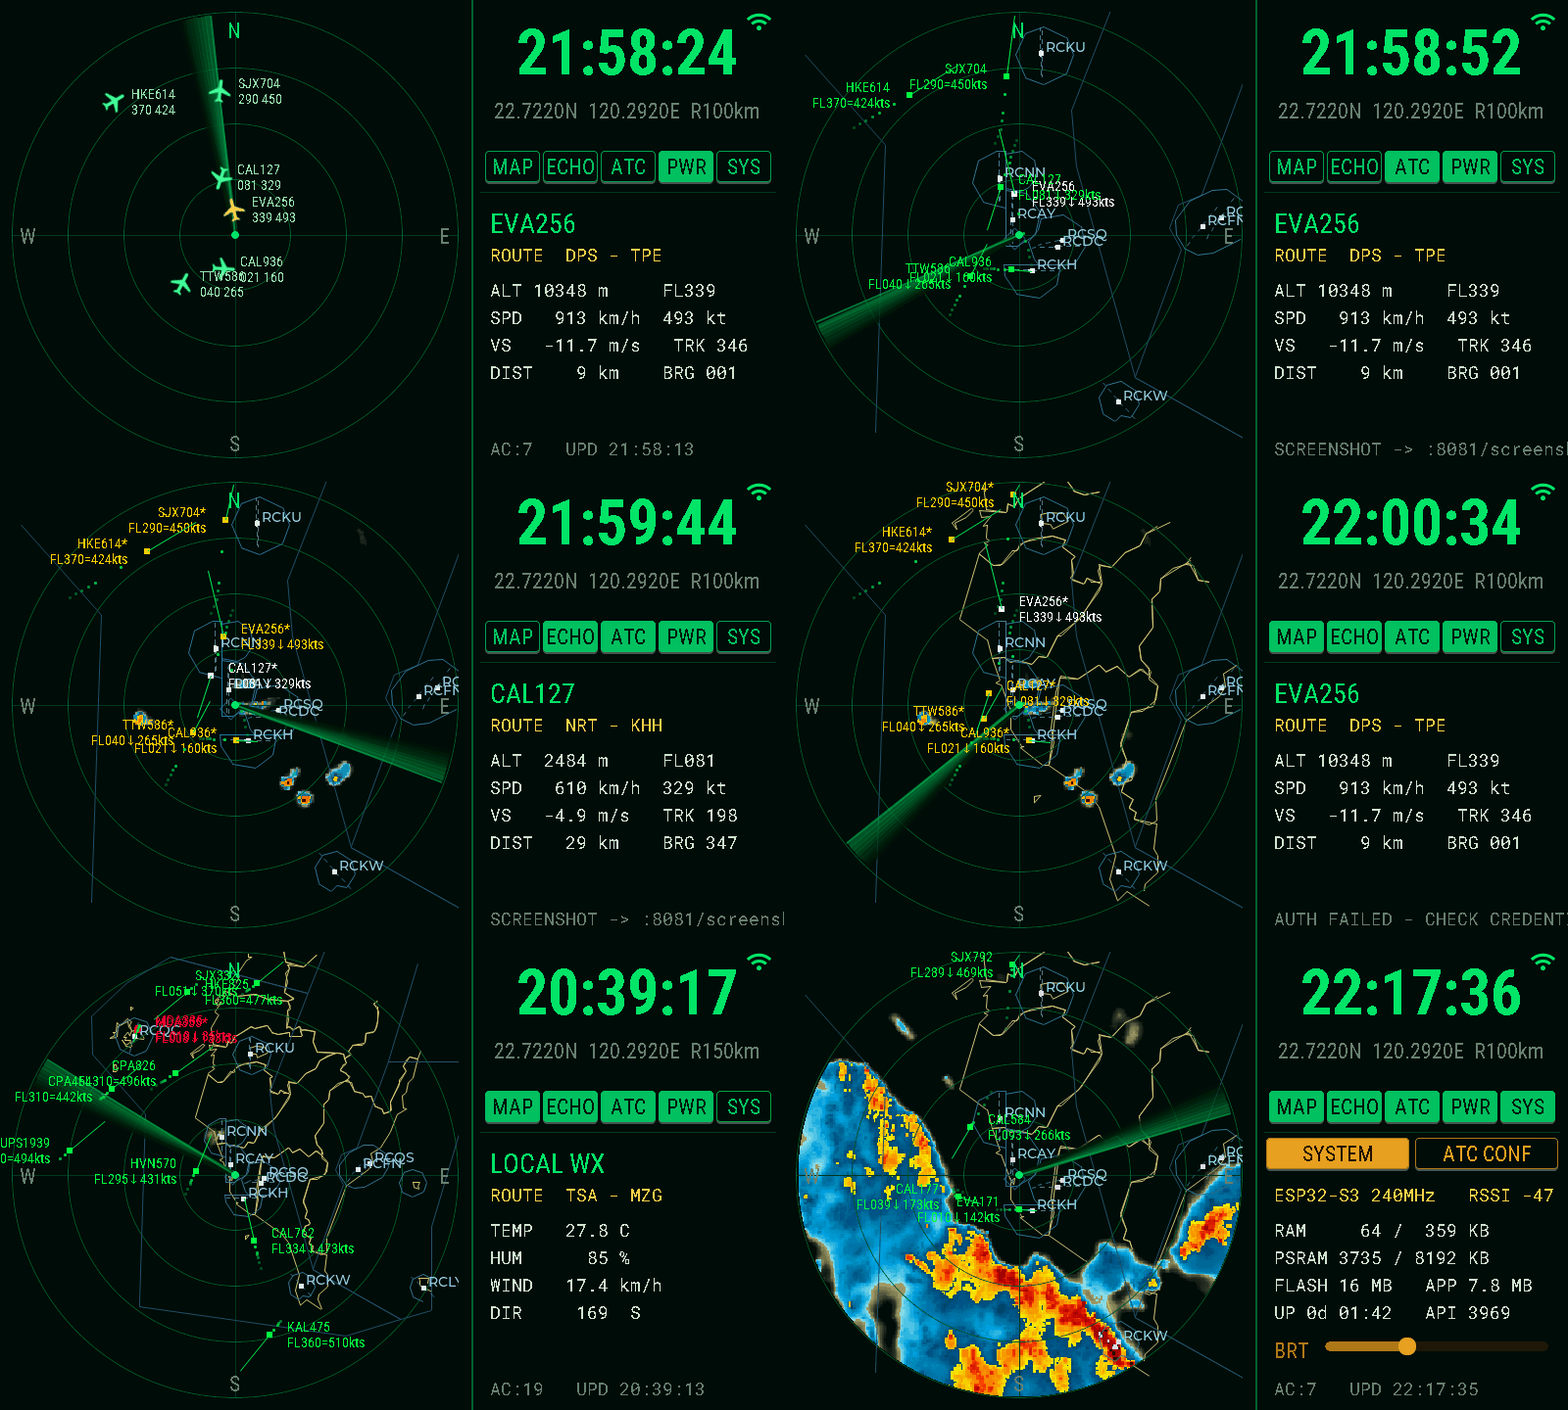
🎬 Demo video / 示範影片
▶ Watch the full demo video / 觀看完整示範影片
English
Features
- Live flight radar — pulls aircraft states from the OpenSky Network, airplanes.live or adsb.lol around your coordinates and plots them on a 480×480 radar scope with a rotating sweep, fading trail, and target glow as the beam passes each aircraft.
- Selectable data source + automatic fallback — a SRC selector on the settings page picks OpenSky (OAuth2, 4,000 credits/day) or the free no-key airplanes.live / adsb.lol APIs, each with its own poll interval (POLL2, 5–300 s). If an OpenSky fetch fails (bad credentials, quota exhausted, outage) the device automatically falls back to the free sources for 10 minutes, then retries OpenSky; the status line and SYS panel show which source is active.
- ATC-style labels — each aircraft shows its callsign, flight level and speed, with a heading-oriented plane icon. Tap any aircraft to see its origin → destination (via adsbdb.com), altitude, speed, heading, vertical rate, distance and bearing.
- ATC mode — toggle button switches the plane icons to bare target squares with a 2‑minute velocity vector, a dotted fading history trail, and a local STCA-style conflict alert (two aircraft within 5.5 km / 300 m get flagged red); stale data (no update for 60 s) is flagged yellow with a
*suffix. Turn it off to instantly restore the normal plane-icon view. - Weather echo overlay — optional rain-radar layer from RainViewer, downloaded, decoded and composited entirely on a background core so the UI never stutters. Toggle with an on-screen button.
- Map outline overlay — optional coastline / administrative border layer (Taiwan by default), toggle on screen.
- Home Assistant integration — the device auto-discovers in HA; backlight, Wi-Fi signal and buttons become HA entities.
- Alarm clock — up to 4 alarms, each with per-weekday scheduling. Alarms ring through a Home Assistant media player (any Wi-Fi speaker); each alarm can ring on its own speaker (e.g. weekday alarm in the bedroom, weekend alarm in the living room). On-screen Snooze / Dismiss overlay when ringing.
- Fully on-device setup — first boot opens a Wi-Fi captive portal. Coordinates, scan range, poll interval, OpenSky credentials and the alarm speaker can all be entered on the touch screen (or via the web page / Home Assistant). Everything is stored in NVS and survives reboots.
- OTA updates — after the first USB flash, all future updates are wireless.
Hardware
| Part | Detail |
|---|---|
| Board | ESP32-S3 5" RGB panel board (esp32-s3-5inch-rgb-001), 8 MB PSRAM (octal) + 16 MB flash |
| Panel | 800×480 IPS, ST7262 RGB driver |
| Touch | GT911 capacitive (I²C) |
| Power | USB-C |
| Enclosure | 3D-printable case ships with the board's SDK |
Compatible boards
The exact board is a generic "esp32-s3-5inch-rgb-001" panel sold on AliExpress/Taobao, but nothing in the firmware is vendor-specific. Any board that matches this combo should work after editing the pin map:
- ESP32-S3 with 8 MB octal PSRAM — required; quad-PSRAM boards cannot feed the RGB panel (the config runs PSRAM at 120 MHz octal)
- 800×480 parallel-RGB (DPI) display — the
rpi_dpi_rgbdriver is used; SPI / QSPI / MIPI panels would need a different display platform - GT911 I²C touch controller (FT5x06 / CST8xx need a different
touchscreenplatform) - 16 MB flash — or change
flash_sizeinradar.yaml(the firmware itself is ~1.4 MB)
Candidates include the Waveshare ESP32-S3-Touch-LCD-5, Sunton ESP32-8048S050 and Guition JC8048W550. To port: edit the backlight / I²C / RGB pins and the panel timings in the Hardware pin map section of radar.yaml to match your board's schematic. The UI layout is fixed at 800×480 landscape — other resolutions need a layout rework.
Software requirements
- ESPHome 2025.7 or newer (
pip install esphome) - The dependency
pngleis pulled in automatically viaplatformio_options.
Flashing
git clone https://github.com/delphicchen/esp32_flight_radar
cd esp32_flight_radar
esphome run radar.yaml
First flash must be over USB (/dev/ttyUSB0 or /dev/ttyACM0; add yourself to the dialout group on Linux). If the upload stalls, hold BOOT, tap RESET, release BOOT to enter download mode. After that, esphome run updates over the air.
First-time setup
- On first boot the panel opens a Wi-Fi hotspot
Radar-Setup(password12345678). Connect with your phone and pick your home Wi-Fi in the captive portal. - (Only needed for the OpenSky source) Register a free OpenSky account, then create an API Client in your account settings — this gives you a
client_idandclient_secret(OpenSky uses OAuth2, not your login password). If you pick airplanes.live or adsb.lol as the source instead, no account or key is required at all. - Tap the Wi-Fi icon (top right) or the status line to open the network / API page and enter your OpenSky credentials on screen. You can also fill them at
http://flight-radar.localor in Home Assistant. - Tap the coordinates line to set your latitude / longitude, scan range and OpenSky poll interval on the numeric keypad; the SRC row picks the data source (OPENSKY / A.LIVE / ADSB.LOL) and POLL2 sets the poll interval used with the free sources; a checkbox chooses whether fetching continues while the backlight is off (default: paused). With OpenSky selected the page shows a live estimate of the resulting daily API credit usage (green / amber / red against the free 4,000-credit quota; cost per fetch grows with range); the free sources have no daily quota but cap the radius at 250 NM (≈463 km).
- Aircraft should appear within a minute. Toggle MAP / ECHO as you like.
Alarm clock
- Tap the clock to open the alarm page (4 slots). For each: enable, tap the time to open a large scroll-wheel time picker, choose the weekdays, and (optionally) pick that alarm's own speaker from the dropdown at the end of its row.
- In the config fields set Alarm Speaker (a Home Assistant
media_playerentity, e.g.media_player.living_room) and optionally Alarm Sound URL (an mp3). - In Home Assistant, open the device page and enable "Allow the device to perform Home Assistant actions." Otherwise the ESP32 cannot command the speaker.
- When an alarm fires, a SNOOZE 9m / DISMISS panel appears on screen. The sound re-plays every 15 s until you press DISMISS, so a short mp3 still keeps ringing.
Using a Google Nest / Chromecast speaker
- Add the Google Cast integration in Home Assistant (it auto-discovers Nest/Cast devices on your LAN) → your speaker becomes a
media_playerentity. - In Developer Tools → States find its id (e.g.
media_player.nest_mini) and put it in Alarm Speaker. - Cast devices only play a full, reachable URL. Put an mp3 in Home Assistant's
config/www/and usehttp://<HA-IP>:8123/local/alarm.mp3(use the IP, nothomeassistant.local). - Test first in Developer Tools → Actions:
media_player.play_mediawith your entity and URL. If the speaker rings, the alarm will too.
Speaker auto-discovery (SCAN button)
Instead of typing the entity id by hand, the alarm page can list every media_player in your Home Assistant. One-time setup:
- In Home Assistant open your profile (bottom-left avatar) → Security → Long-lived access tokens → Create token. Copy it — it is shown only once.
- Open the device's web page at
http://flight-radar.local(or the device page in HA) and paste the token into HA Token. HA URL can stay empty — it defaults tohttp://homeassistant.local:8123; if the scan later reportsHA UNREACHABLE, set it to your HA address by IP instead (e.g.http://192.168.1.10:8123— mDNS name resolution is unreliable on some networks). Both fields are saved to flash and survive reboots. - Open the alarm page — it scans automatically on entry once the token is set (or press SCAN in the top bar). All speaker dropdowns fill with friendly names: the DEF dropdown in the top bar is the default speaker (used by any alarm without its own), and each alarm row ends with that alarm's own dropdown. Picking a speaker saves immediately. Manual entry still works too (entities Alarm Speaker and Alarm 1–4 Speaker; leave an alarm's entry empty to use the default).
Troubleshooting: SET HA TOKEN FIRST = step 2 not done yet; TOKEN INVALID = the token is wrong or was revoked; HA UNREACHABLE = wrong HA URL / use the IP; NO SPEAKERS FOUND = HA has no media_player entities (add the Google Cast / Sonos / etc. integration first).
Security note: a long-lived token grants full access to your Home Assistant and is stored in the device's flash. Treat it like a password and keep the device on a trusted network — the firmware only uses it for this read-only speaker query.
ATC mode
Press the ATC button (in the top-right button row, between ECHO and PWR) to switch the radar from plane icons to an air-traffic-control style view; press again to instantly restore the default view.
- Each aircraft becomes a small green target square. Tap it exactly like the plane icon to select/deselect (same
select_slotbehavior). - A thin line projects each aircraft's position 2 minutes ahead based on its current heading and ground speed.
- A dotted fading trail follows behind, through its last few fetched positions (dots, so it can't be confused with the solid vector line).
- Labels switch to two lines: callsign on top,
FL<flight level><climb arrow><speed>ktsbelow (↑climbing,↓descending,=level); the label auto-flips to the other side of the target when the velocity vector would run through it. - Conflict alert (red): any two aircraft within 5.5 km horizontally and 300 m vertically both turn red; if one of them is the selected aircraft it blinks white/red instead of solid white.
- Stale data (yellow): if the data source hasn't updated an aircraft in over 60 s, its label turns yellow and gets a trailing
*. - Selected aircraft (no conflict) stay white.
- Static video map: ATC mode also bakes the
map_data.hoverlays into the base layer — airspace boundaries (CTR-class zones brighter blue, TMA/CTA dimmer), runways with dashed extended centerlines, airport squares with ICAO codes, and navaid/fix triangles with names. All of it disappears when ATC mode is switched off. - Layer panel: the SYS button has two amber tabs — SYSTEM (hardware info + remaining OpenSky API quota, or the active free source when on airplanes.live / adsb.lol) and ATC CONF, where four toggles (AIRSPACE / RUNWAY / AIRPORT / FIXES) choose which map layers to draw (saved to NVS). The idle bottom-right panel keeps showing the local weather as usual.
Screenshots to Home Assistant
Swipe three fingers downward anywhere on the screen to take a screenshot. The device snapshots the framebuffer, serves it at http://flight-radar.local:8081/screenshot.bmp (800×480 BMP) and fires the HA event esphome.flight_radar_screenshot. To save it automatically, add the Downloader integration in HA (set its directory, e.g. /config/downloads) and an automation:
automation:
  - alias: Save flight radar screenshot
    trigger:
      - platform: event
        event_type: esphome.flight_radar_screenshot
    action:
      - service: downloader.download_file
        data:
          url: "http://flight-radar.local:8081/screenshot.bmp"
          filename: "radar_{{ now().strftime('%Y%m%d_%H%M%S') }}.bmp"
You can also just open the URL in a browser. If the colors come out wrong (red/blue swapped), set SHOT_SWAP_BYTES to 1 in radar_fetch.h and re-flash.
Configuration reference
All of these are Home Assistant / web entities, stored in NVS:
| Setting | Meaning |
|---|---|
| OpenSky Client ID / Secret | OAuth2 API client credentials |
| Home Latitude / Longitude | Radar center (your location) |
| Radar Range | Scan radius in km (10–500) |
| Poll Interval | Seconds between OpenSky fetches (default 30 → 2880/day, within the 4000/day quota) |
| Poll Interval Alt | Seconds between fetches on the free sources (airplanes.live / adsb.lol, 5–300, default 15) |
| HA URL | Home Assistant address for speaker scan (empty = http://homeassistant.local:8123) |
| HA Token | HA long-lived access token used by the SCAN button |
| Alarm Speaker | Default HA media_player entity to ring through (type it or use SCAN) |
| Alarm 1–4 Speaker | Per-alarm speaker override; empty = use Alarm Speaker |
| Alarm Sound URL | mp3 to play when an alarm fires |
Using it outside Taiwan
The repo ships with a Taiwan outline in map_data.h, but the radar projection itself is fully generic — just regenerate the map for your own location before compiling:
# Tokyo, up to 150 km range
python tools/make_map.py --lat 35.6762 --lon 139.6503 --radius 150

# London, 300 km, with state/province borders
python tools/make_map.py --lat 51.5074 --lon -0.1278 --radius 300 --states
The script (pure Python, no packages needed) downloads Natural Earth 1:10m coastline + country border data (public domain, cached in tools/cache/), clips it around your coordinates, simplifies it to roughly one radar pixel of detail, and overwrites map_data.h. Set --radius to the largest radar range you plan to use. Useful options: --states adds admin-1 borders (can be dense in some countries), --geojson file.geojson uses your own boundary file instead of downloading, --tol / --max-points control detail.
The script also generates ATC overlay data (AIRPORTS[], RUNWAYS[], FIXES[], AIRSPACES[]) into the same map_data.h. A complete run that produces everything at once:
# Taipei, 200 km: outline + airports & runways + navaids + 5-letter fixes + CTR/TMA airspaces
python tools/make_map.py --lat 25.03 --lon 121.56 --radius 200 \
    --countries TW --min-airport small --rwy-ext 15 \
    --fixes-csv my_fixes.csv --openaip-key YOURKEY
| Flag | What it does |
|---|---|
--countries TW |
restrict airports/navaids to these ISO country codes (omit = everything in range) |
--min-airport small |
also include small airfields (default medium; scheduled-service ones are always kept) |
--rwy-ext 15 |
runway centerline extension in km (default 10) |
--fixes-csv my_fixes.csv |
add 5-letter AIP waypoints, one NAME,lat,lon per line |
--openaip-key YOURKEY |
fetch CTR/TMA/CTA airspaces from openAIP (free account, data CC BY-NC); alternatively --airspace-geojson file.geojson (features need name + type properties), --airspace-types picks the classes |
--no-outline |
keep the MAP_OUTLINE already in the file (e.g. the stock g0v Taiwan outline), refresh overlays only |
--no-airports / --no-fixes |
skip those overlays entirely |
Airports, runways and navaids come from OurAirports open data (public domain, no key needed). Without an airspace source, AIRSPACES[] is simply empty. Note that openAIP coverage is community-maintained and varies a lot by region — Europe is dense, but Taiwan has zero airspace data there. For Taiwan the repo bundles tools/taiwan_airspace.geojson (FIR + 6 TMAs + 21 airport control zones), converted from the CAA eAIP ENR 2.1 with tools/eaip_enr21_to_geojson.py — that converter works on any IDS-AIRNAV-style eAIP ENR 2.1 page (handles coordinate lists, circles and arcs), so other un-covered countries can use the same route. The stock map_data.h was produced with:
python tools/make_map.py --lat 23.8 --lon 121.0 --radius 320 --countries TW --no-outline \
    --airspace-geojson tools/taiwan_airspace.geojson
Data sources & credits
- Aircraft states — OpenSky Network, airplanes.live, adsb.lol
- Route lookup — adsbdb.com
- Weather radar — RainViewer
- Local weather — Open-Meteo
- Taiwan boundaries — g0v/twgeojson
- World map data — Natural Earth (public domain)
- Airports / runways / navaids — OurAirports (public domain)
- Taiwan airspace boundaries — Taiwan CAA eAIP ENR 2.1
- Airspace boundaries elsewhere (optional) — openAIP (CC BY-NC)
- Concept — AnthonySturdy/micro-radar
- Climb/descent arrow glyphs — DejaVu Sans (Bitstream Vera / DejaVu license,
fonts/DejaVuSans.ttf)
Please respect each provider's free-tier terms; this project is a hobby build, not a service.
中文
功能
- 即時航班雷達 — 從 OpenSky Network、airplanes.live 或 adsb.lol 取得你座標周圍的航班,繪製在 480×480 雷達盤上,附旋轉掃描線、漸暗餘暉,以及掃描線掃過飛機時的高亮效果。
- 可選資料來源 + 自動備援 — 設定頁的 SRC 列可選 OpenSky(OAuth2,每日 4000 credits)或免金鑰的 airplanes.live / adsb.lol 免費 API,免費來源有獨立輪詢間隔(POLL2,5–300 秒)。OpenSky 抓取失敗(憑證錯誤、額度用盡、服務中斷)會自動改用免費來源 10 分鐘後再回試;狀態列與 SYS 面板會顯示目前實際來源。
- 航管風格標籤 — 每架飛機顯示呼號、飛航高度層與速度,搭配依航向旋轉的飛機圖示。點選任一飛機可查看起點 → 目的地(透過 adsbdb.com)、高度、速度、航向、垂直速率、距離與方位。
- ATC 模式 — 按鈕切換,飛機圖���換成純目標方塊,附未來 2 分鐘速度向量線、漸淡的點線歷史軌跡,以及本地端 STCA 風格衝突告警(兩機水平距離 < 5.5km 且高度差 < 300m 觸發紅色);資料超過 60 秒未更新則標為黃色並加
*。再按一次立即還原成預設的飛機圖示畫面。 - 氣象回波圖層 — 可選的降雨雷達層,資料來自 RainViewer;下載、解碼、合成全部在背景核心完成,主畫面完全不卡。以螢幕按鈕開關。
- 地圖輪廓圖層 — 可選的海岸線 / 行政區界(預設台灣),螢幕按鈕開關。
- Home Assistant 整合 — 裝置會自動被 HA 探索;背光、Wi-Fi 訊號與按鈕都成為 HA 實體。
- 鬧鐘 — 最多 4 組,每組可設定特定星期幾。鬧鐘透過 Home Assistant 的媒體播放器(任何 Wi-Fi 喇叭)發聲,且每組鬧鐘可指定不同喇叭(例如平日鬧鐘在臥室響、週末鬧鐘在客廳響)。響鈴時螢幕出現貪睡 / 關閉面板。
- 完全在裝置上設定 — 首次開機開啟 Wi-Fi 設定熱點。座標、掃描半徑、輪詢間隔、OpenSky 憑證、鬧鐘喇叭都可以直接在觸控螢幕上輸入(也可透過網頁 / Home Assistant)。全部存於 NVS,重開機保留。
- OTA 無線更新 — 第一次用 USB 燒錄後,之後都能無線更��。
硬體
| 零件 | 說明 |
|---|---|
| 主板 | ESP32-S3 5 吋 RGB 屏方案板(esp32-s3-5inch-rgb-001),8 MB PSRAM(octal)+ 16 MB flash |
| 面板 | 800×480 IPS,ST7262 RGB 驅動 |
| 觸控 | GT911 電容式(I²C) |
| 供電 | USB-C |
| 外殼 | 方案板 SDK 附 3D 列印外殼檔 |
相容板子
本專案用的是淘寶/AliExpress 常見的白牌 「esp32-s3-5inch-rgb-001」 方案板,但韌體沒有綁定任何廠商。符合以下組合的板子改腳位後都能用:
- ESP32-S3 + 8 MB octal PSRAM — 必要;quad PSRAM 頻寬餵不動 RGB 屏(設定跑 120 MHz octal)
- 800×480 平行 RGB(DPI)螢幕 — 使用
rpi_dpi_rgb驅動;SPI / QSPI / MIPI 屏需要換 display 平台 - GT911 I²C 觸控(FT5x06 / CST8xx 要換
touchscreen平台) - 16 MB flash — 或修改
radar.yaml的flash_size(韌體本身約 1.4 MB)
可行的例子:Waveshare ESP32-S3-Touch-LCD-5、Sunton ESP32-8048S050、Guition JC8048W550。移植方式:照你板子的原理圖修改 radar.yaml 中 Hardware pin map 區的背光 / I²C / RGB 腳位與面板時序即可。UI 版面寫死 800×480 橫向,其他解析度需要重排版面。
軟體需求
- ESPHome 2025.7 以上(
pip install esphome) - 相依的
pngle會由platformio_options自動安裝。
燒錄
git clone https://github.com/delphicchen/esp32_flight_radar
cd esp32_flight_radar
esphome run radar.yaml
第一次必須用 USB 燒錄(/dev/ttyUSB0 或 /dev/ttyACM0;Linux 上把自己加入 dialout 群組)。若燒錄卡住,按住 BOOT、點一下 RESET、放開 BOOT 進入下載模式。之後 esphome run 就能走 OTA 無線更新。
首次設定
- 首次開機面板會開啟 Wi-Fi 熱點
Radar-Setup(密碼12345678)。用手機連上,在跳出的設定頁選擇你家的 Wi-Fi。 - (只有選用 OpenSky 來源才需要)註冊**免費的 OpenSky 帳號,到帳號設定裡建立一個 API Client,取得
client_id與client_secret(OpenSky 使用 OAuth2,不是用你的登入密碼)。若改選 airplanes.live 或 adsb.lol 來源,完全不用註冊或金鑰。 - 點螢幕右上角的 Wi-Fi 圖示或底部狀態列開啟網路 / API 設定頁,在螢幕上輸入 OpenSky 憑證。也可以在
http://flight-radar.local或 Home Assistant 填寫。 - 點座標列用數字鍵盤設定你的經緯度、掃描半徑與 OpenSky 輪詢秒數;SRC 列選擇資料來源(OPENSKY / A.LIVE / ADSB.LOL),POLL2 設定免費來源的輪詢秒數;並可勾選背光關閉時是否持續抓取(預設暫停)。選 OpenSky 時頁面會即時估算每日 API credits 消耗(以免費額度 4000/日 對照,綠/黃/紅顯示;半徑越大單次扣越多);免費來源無每日額度,但查詢半徑上限 250 海里(約 463 km)。
- 約一分鐘內飛機就會出現。依喜好切換 MAP / ECHO。
鬧鐘
- 點時鐘開啟鬧鐘頁(4 組)。每組:啟用、點時間彈出大型捲輪選擇器設定時 / 分、選擇星期幾,列尾的下拉選單可(選擇性)指定該組專屬喇叭。
- 在設定欄位填入 Alarm Speaker(Home Assistant 的
media_player實體,例如media_player.living_room),以及可選的 Alarm Sound URL(mp3)。 - 在 Home Assistant 的裝置頁開啟「允許此裝置執行 Home Assistant 動作」,否則 ESP32 無法命令喇叭。
- 鬧鐘響時,螢幕會出現 SNOOZE 9m / DISMISS 面板。聲音會每 15 秒重播一次,直到你按下 DISMISS,所以短音檔也能持續響。
使用 Google Nest / Chromecast 喇叭
- 在 Home Assistant 新增 Google Cast 整合(會自動發現區網內的 Nest / Cast 裝置)→ 喇叭變成一個
media_player實體。 - 到 開發者工具 → 狀態 找出它的 id(例如
media_player.nest_mini),填進 Alarm Speaker。 - Cast 裝置只吃完整、連得到的 URL。把 mp3 放到 HA 的
config/www/,網址用http://<HA的IP>:8123/local/alarm.mp3(用 IP,不要用homeassistant.local)。 - 先在 開發者工具 → 動作 用
media_player.play_media帶入你的實體與網址測試;喇叭有響,鬧鐘就會響。
自動搜尋喇叭(SCAN 鈕)
不必手打 entity id,鬧鐘頁可以直接列出 HA 裡所有的 media_player。一次性設定:
- 在 Home Assistant 開啟個人資料(左下角頭像)→ 安全性 → 長期存取權杖 → 建立權杖,複製起來——它只會顯示這一次。
- 開啟裝置網頁
http://flight-radar.local(或 HA 的裝置頁),把權杖貼進 HA Token。HA URL 可以留空——預設http://homeassistant.local:8123;若之後掃描顯示HA UNREACHABLE,請改填 HA 的 IP(如http://192.168.1.10:8123,mDNS 名稱解析在部分網路不可靠)。兩個欄位都會存進 flash,重開機不會消失。 - 開啟鬧鐘頁——權杖填好後進頁會自動掃描(也可按頂列的 SCAN)。所有喇叭下拉選單會列出友善名稱:頂列 DEF 選單是預設喇叭(沒有專屬喇叭的鬧鐘用它),每組鬧鐘列尾則是該組的專屬選單。挑了就立即存檔。仍然可以手動填寫(實體 Alarm Speaker 與 Alarm 1–4 Speaker;某組留空 = 用預設)。
疑難排解:SET HA TOKEN FIRST = 還沒做第 2 步;TOKEN INVALID = 權杖錯誤或已撤銷;HA UNREACHABLE = HA URL 不對,改用 IP;NO SPEAKERS FOUND = HA 裡沒有任何 media_player 實體(先新增 Google Cast / Sonos 等整合)。
**安全性提醒:**長期權杖等同 HA 的完整存取權,且儲存在裝置 flash 中。請把它當密碼看待、讓裝置留在信任的內網;韌體只會用它做這個唯讀的喇叭查詢。
ATC 模式
按右上角按鈕列的 ATC 鈕(在 ECHO 與 PWR 之間)切換成航管風格畫面;再按一次立即還原成預設的飛機圖示畫面。
- 每架飛機變成一個小小的綠色目標方塊,點擊方式跟飛機圖示一樣(照樣呼叫
select_slot選取/取消選取)。 - 一條細線依目前航向與地速,投射該機2 分鐘後的推算位置。
- 點線漸淡軌跡跟在機後,連向最近幾次抓取到的舊位置(點狀,不會與實線向量混淆)。
- 標籤改成兩行:第一行呼號,第二行
FL高度層+爬升箭頭+速度kts(↑爬升、↓下降、=平飛);向量線會穿過標籤時,標籤自動翻到目標另一側。 - 衝突告警(紅色):任兩機水平距離 < 5.5 km 且高度差 < 300 m 時雙雙變紅;若其中一台是目前選取的飛機,改成白/紅交替閃爍而非純白。
- 資料延遲(黃色):資料來源超過 60 秒沒更新該機資料,標籤變黃並在呼號後加
*。 - 選取中且無衝突的飛機維持白色。
- 靜態航圖(video map):ATC 模式同時把
map_data.h的圖層烤進底圖——管制空域邊界(CTR 類亮藍、TMA/CTA 暗藍)、跑道與虛線延伸中線、機場方塊+ICAO 代碼、導航點三角+名稱。關閉 ATC 模式即全部消失。 - 圖層面板:SYS 鈕內有兩個 amber 色分頁——SYSTEM(硬體資訊+OpenSky API 當日剩餘額度;用免費來源時改顯示目前來源)與 ATC CONF,後者的四個開關(AIRSPACE / RUNWAY / AIRPORT / FIXES)設定要畫哪些航圖圖層(存 NVS)。右下閒置畫面維持顯示在地天氣,跟原本一樣。
截圖存到 Home Assistant
在螢幕任意處三指下滑即截圖。裝置會快照 framebuffer、在 http://flight-radar.local:8081/screenshot.bmp 提供 800×480 BMP,並發出 HA 事件 esphome.flight_radar_screenshot。要自動存檔的話,在 HA 加入 Downloader 整合(設定下載目錄,例如 /config/downloads)並建立自動化:
automation:
  - alias: 存雷達截圖
    trigger:
      - platform: event
        event_type: esphome.flight_radar_screenshot
    action:
      - service: downloader.download_file
        data:
          url: "http://flight-radar.local:8081/screenshot.bmp"
          filename: "radar_{{ now().strftime('%Y%m%d_%H%M%S') }}.bmp"
也可以直接用瀏覽器開那個網址。若截圖顏色不對(紅藍對調),把 radar_fetch.h 的 SHOT_SWAP_BYTES 改成 1 重新燒錄。
設定項一覽
以下皆為 Home Assistant / 網頁實體,存於 NVS:
| 設定 | 意義 |
|---|---|
| OpenSky Client ID / Secret | OAuth2 API 憑證 |
| Home Latitude / Longitude | 雷達中心(你的位置) |
| Radar Range | 掃描半徑(公里,10–500) |
| Poll Interval | OpenSky 抓取間隔秒數(預設 30 → 每日 2880 次,在 4000 次/日額度內) |
| Poll Interval Alt | 免費來源(airplanes.live / adsb.lol)抓取間隔秒數(5–300,預設 15) |
| HA URL | 喇叭掃描用的 HA 位址(留空 = http://homeassistant.local:8123) |
| HA Token | SCAN 鈕使用的 HA 長期存取權杖 |
| Alarm Speaker | 預設發聲的 HA media_player 實體(手填或用 SCAN 選) |
| Alarm 1–4 Speaker | 各組鬧鐘的專屬喇叭;留空 = 用 Alarm Speaker |
| Alarm Sound URL | 鬧鐘響時播放的 mp3 |
在台灣以外地區使用
repo 內附的 map_data.h 是台灣輪廓,但雷達投影本身完全通用——編譯前為你的位置重新產生地圖即可:
# 東京,最大半徑 150 km
python tools/make_map.py --lat 35.6762 --lon 139.6503 --radius 150

# 倫敦,300 km,加省/州界
python tools/make_map.py --lat 51.5074 --lon -0.1278 --radius 300 --states
腳本(純 Python,免裝套件)會下載 Natural Earth 1:10m 海岸線+國界資料(public domain,快取於 tools/cache/),裁切你座標周圍的範圍、簡化到約一個雷達像素的細節,然後覆寫 map_data.h。--radius 請設為你會用到的最大雷達半徑。常用選項:--states 加省/州界(部分國家會很密)、--geojson file.geojson 改用自備邊界檔不下載、--tol / --max-points 調細節。
腳本同時會產生 ATC 圖層資料(AIRPORTS[]、RUNWAYS[]、FIXES[]、AIRSPACES[])到同一個 map_data.h。一次產生全部資訊的完整範例:
# 台北 200 km:輪廓 + 機場/跑道 + 導航台 + 5 碼航點 + CTR/TMA 空域
python tools/make_map.py --lat 25.03 --lon 121.56 --radius 200 \
    --countries TW --min-airport small --rwy-ext 15 \
    --fixes-csv my_fixes.csv --openaip-key YOURKEY
| 選項 | 作用 |
|---|---|
--countries TW |
機場/導航台只保留這些 ISO 國碼(不給 = 範圍內全部) |
--min-airport small |
連小型機場也納入(預設 medium;有定期航班的一律保留) |
--rwy-ext 15 |
跑道中線延伸公里數(預設 10) |
--fixes-csv my_fixes.csv |
匯入 AIP 的 5 碼航點,每行 NAME,lat,lon |
--openaip-key YOURKEY |
從 openAIP 抓 CTR/TMA/CTA 空域(免費註冊;資料授權 CC BY-NC);也可改用 --airspace-geojson file.geojson(feature 需有 name+type 屬性),--airspace-types 選類別 |
--no-outline |
保留檔內既有�� MAP_OUTLINE(例如內附的 g0v 台灣輪廓),只更新圖層陣列 |
--no-airports / --no-fixes |
完全跳過該圖層 |
機場、跑道、導航台資料來自 OurAirports 開放資料(public domain,免金鑰)。沒給空域來源時 AIRSPACES[] 就是空的。注意 openAIP 是社群維護、各地覆蓋差很多——歐洲很完整,但台灣完全沒有空域資料。台灣空域 repo 已內附 tools/taiwan_airspace.geojson(FIR + 6 個 TMA + 21 個機場管制空域),由 tools/eaip_enr21_to_geojson.py 從民航局 eAIP ENR 2.1 轉出——這個轉換器支援座標點列、圓、圓弧三種幾何,任何 IDS AIRNAV 系統的 eAIP 都適用,其他 openAIP 沒覆蓋的國家可走同樣路線。內附的 map_data.h 由這個指令產生:
python tools/make_map.py --lat 23.8 --lon 121.0 --radius 320 --countries TW --no-outline \
    --airspace-geojson tools/taiwan_airspace.geojson
資料來源與致謝
- 航班狀態 — OpenSky Network、airplanes.live、adsb.lol
- 航線查詢 — adsbdb.com
- 氣象雷達 — RainViewer
- 在地天氣 — Open-Meteo
- 台灣界線 — g0v/twgeojson
- 世界地圖資料 — Natural Earth(public domain)
- 機場 / 跑道 / 導航台 — OurAirports(public domain)
- 台灣管制空域邊界 — 民航局 eAIP ENR 2.1
- 其他地區空域邊界(選用)— openAIP(CC BY-NC)
- 概念啟發 — AnthonySturdy/micro-radar
- 爬升/下降箭頭字型 — DejaVu Sans(Bitstream Vera / DejaVu 授權,
fonts/DejaVuSans.ttf)
請遵守各資料來源的免費方案條款;本專案是自用興趣作品,並非商業服務。
🔗 Links / 友链
- 非常感谢 LINUX DO 社区提供的交流平台 / Many thanks to the LINUX DO community for the great discussion platform.
📄 License / 授權
Creative Commons Attribution-NonCommercial-ShareAlike 4.0 International (CC BY-NC-SA 4.0)
You are free to use, share and adapt this project for non-commercial purposes, as long as you give appropriate credit and license your derivatives under the same terms. Commercial use is not permitted. See LICENSE.
你可以基於非商業目的自由使用、分享與改作本專案,前提是註明出處並以相同條款授權你的衍生作品。不允許���業使用。 詳見 LICENSE。
© 2026 delphicchen
Comments