IR control in Home Assistant used to mean picking your manufacturer's integration, hoping its code database had your device model, and either trusting a JSON file from a forum or hand-rolling template entities. The captured signals lived on the blaster. The user lived in YAML. The codes were trapped where they were learned: a Broadlink app's cloud, a vendor hub, a config file on disk.
HAIR moves IR into Home Assistant itself. Point any remote at an ESPHome IR receiver, press a button, and HAIR turns that signal into a native HA entity. A button you can fire from any dashboard. An event that triggers automations. A command broadcast through any blaster on HA's native infrared platform, whether that is an ESPHome IR LED, a Tuya Local IR blaster, a Broadlink RM, an SMLIGHT SLZB, or anything else that adopts the platform.
No manufacturer picker. No model lookup. No code file downloads. No YAML. Just point, press, use.
Platform state
Home Assistant is mid-rollout of its native infrared platform. The transmit side shipped in HA 2026.4. The receive side is approved and on the HA roadmap for 2026.6 or 2026.7.
Infrared platform compatibility
HAIR works with any integration that exposes HA's native infrared entity platform. These integrations have adopted it:
| Integration | Source | TX | RX | Status |
|---|---|---|---|---|
| ESPHome | Core | Yes | Yes (bridge) | Since 2026.4 |
| Tuya Local | HACS | Yes | No | Since 2026.4 |
| Broadlink | Core | Yes | No | Since 2026.5 |
| SMLIGHT | Core | Yes | No | Since 2026.5 |
ESPHome is the only integration with receive (RX) support today, using a temporary YAML bridge (see ESPHome Receiver Setup below). When HA ships native InfraredReceiverEntity (expected 2026.6 or 2026.7), any integration that adopts it will work as a HAIR receiver automatically.
As more integrations adopt the infrared platform, HAIR picks them up with no changes needed on HAIR's side.
Until the native receive entities land, HAIR uses a thin ESPHome remote_receiver YAML bridge to forward signals to HA's event bus (see ESPHome Receiver Setup below for the short stub). When the native receive entities ship, HAIR migrates users to the official API automatically. The TX side does not change.
HAIR fingerprints every captured signal using short/long (S/L) pulse-duration analysis. Each pulse is classified short or long, producing a pattern that identifies the signal regardless of minor timing jitter between presses. S/L works across NEC, Samsung, JVC, LG, Sony, and RC-5/RC-6 without needing to decode the protocol. The Sniffer groups signals by source remote, deduplicates repeated presses, filters held-button repeat frames, and tracks hit counts, all in real time.
Screenshots
| Devices Overview | Device Detail |
|---|---|
 |
 |
| Action Mapping | Sniffer |
|---|---|
 |
 |
| Assign Signal | Create Trigger | Promote Device |
|---|---|---|
 |
 |
 |
Requirements
- Home Assistant 2026.4 or later
- Python 3.12+
- For capture (RX): an ESPHome device with the
remote_receivercomponent (see ESPHome Receiver Setup for the temporary YAML bridge) - For send (TX): at least one integration on HA's native infrared platform (ESPHome infrared entities, Tuya Local IR blasters, Broadlink RM series, etc.)
Installation
HACS (Recommended)
- Open HACS in your Home Assistant instance
- Go to Integrations
- Click the three-dot menu > Custom repositories
- Add
https://github.com/DAB-LABS/HAIRwith category Integration - Search for "HAIR" and install
- Restart Home Assistant
Manual
- Copy
custom_components/hairinto your HAcustom_components/directory - Restart Home Assistant
Setup
- Go to Settings > Devices & Services
- Click Add Integration and search for "HAIR"
- The config flow auto-detects your IR hardware (emitters and receivers)
- Once added, find HAIR in the sidebar
ESPHome Receiver Setup
HAIR's Sniffer needs IR signals to arrive on the HA event bus. HA 2026.4 shipped the infrared platform for TX (emitters), but the RX side (InfraredReceiverEntity) is not yet available. It is approved and on the HA roadmap for 2026.6-2026.7 (architecture discussion #1372). Until then, ESPHome devices need a small YAML bridge to forward received signals to HA.
Add this to your ESPHome device's remote_receiver block:
remote_receiver:
  id: ir_receiver
  pin:
    number: GPIO5   # your IR receiver data pin
    inverted: true
  dump: pronto
  on_pronto:
    then:
      - homeassistant.event:
          event: esphome.remote_received
          data:
            protocol: "PRONTO"
            code: !lambda 'return x.data;'
The on_pronto trigger catches every IR signal regardless of protocol (NEC, Samsung, Sony, RC-5, etc.) and fires it as a homeassistant.event on the HA bus. HAIR's Signal Monitor subscribes to these events automatically.
This bridge is temporary. When HA ships InfraredReceiverEntity, HAIR will migrate to the official infrared.async_subscribe_receiver() API and no ESPHome YAML customization will be needed. The existing ir_rf_proxy TX configuration is unaffected by this change.
For ready-made, HAIR-tested configurations for common ESP32 boards and IR devices, see esphome/ in this repo.
Features
Signal Sniffer - Passive IR listener that runs in the background. Every IR transmission your receivers detect is captured, fingerprinted, and grouped by source device. Signals are deduplicated automatically: press the same button ten times and you see one signal with a hit count of ten. Repeat frames (sent when you hold a button down) are filtered out so only actual command signals appear. The Sniffer shows you what remotes are active in your home and which buttons are being pressed, all in real time.
Device Management - Create profiles for your IR-controlled devices (TVs, ACs, fans, lights, switches, screens). Assign captured signals as named commands from a device-type-aware template list, or enter custom names. Each device gets native HA entities automatically based on its type.
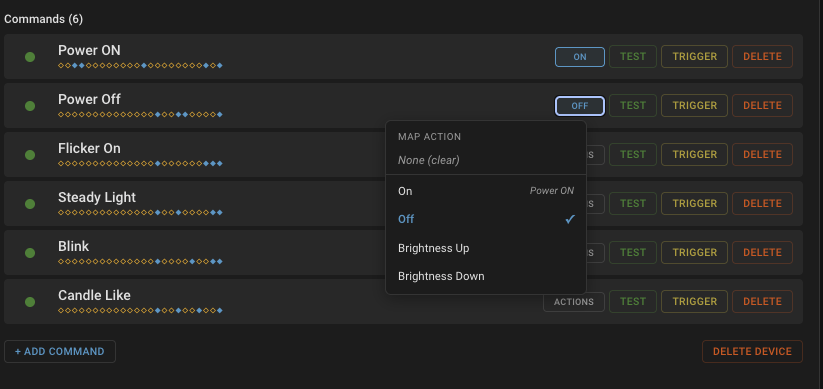
Action Mapping - Explicitly bind IR commands to HA entity features through a popover UI. When you map a command to "Volume Up," the media_player entity knows to call that command when the HA volume service is used. Features are only exposed when commands are mapped, so your entities stay clean.
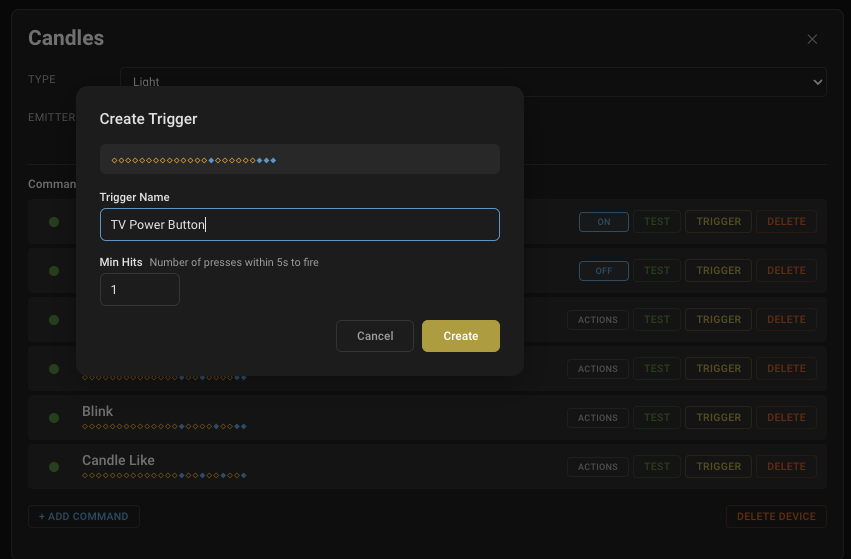
Triggers - Turn any IR signal into a native HA event entity. Create a trigger from a learned device command or from an unknown signal in the Sniffer. Each trigger gets an event entity under a virtual "HAIR Triggers" device, firing an ir_command_received event whenever the matching signal is received. Use triggers to build HA automations that react to physical remote presses (e.g., pressing a TV power button also turns off the room lights). A configurable "min hits" threshold (minimum button presses) lets you require multiple presses within a 5-second window before the trigger fires, which is useful for preventing accidental activations. The Devices tab shows all active triggers with real-time fire animations.
Emitter Routing & Broadcast Control - Assign one or more IR emitters to each device with explicit control over how commands are broadcast. Lock a device to a single emitter for room-scoped control (an AC pinned to the bedroom emitter so commands never leak to the living room), or assign multiple emitters for a wide broadcast (a single "TV Power" command fires through emitters in every room simultaneously). Routing is configured per-device, so you can mix tight per-room targeting for some devices with whole-house broadcast for others.
Command Templates - Guided setup suggests which commands to capture based on device type. Select from predefined names (Power On, Volume Up, Mode: Cool, etc.) or enter custom names for anything not in the list.
Using HAIR
The Devices Tab
The main view shows five sections:
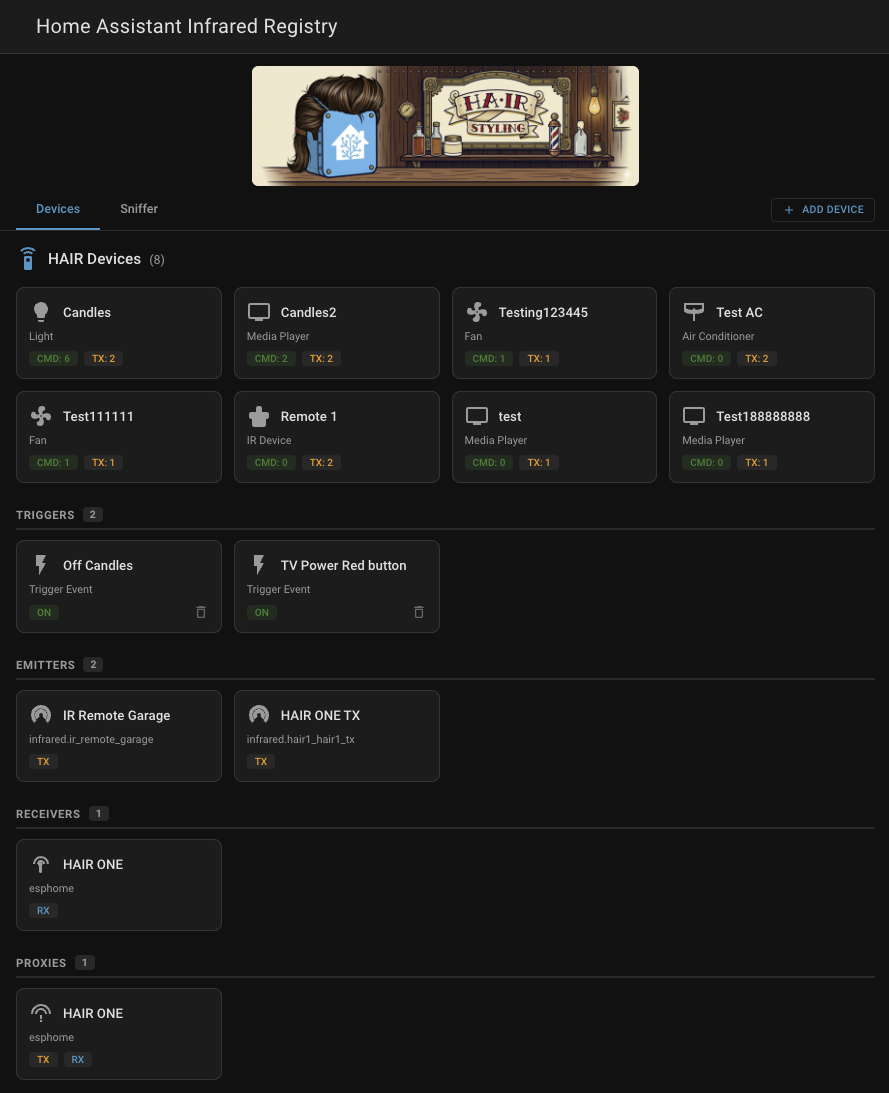
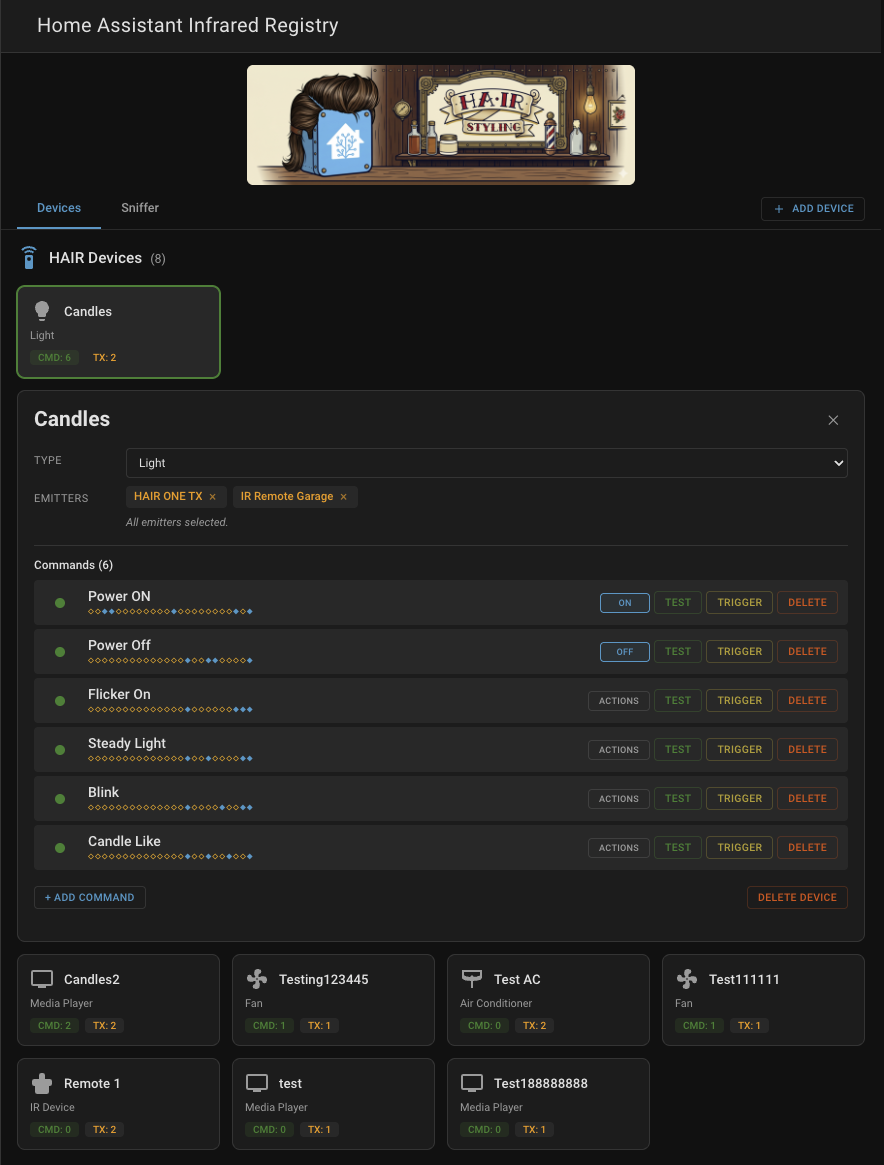
HAIR Devices - Your managed IR device profiles. Each card shows the device name, type, command count, and how many emitters are assigned. Click a device to expand its detail view inline, where you can change the device type, manage emitters, and see all learned commands with their S/L diamond fingerprint patterns. From here you can test commands, delete them, or assign action mappings.
Triggers - Active IR triggers that fire HA event entities when their signal is detected. Each trigger card shows the trigger name with a lightning bolt icon. When a trigger fires, the card flashes with an amber glow animation in real time.
Emitters - Your IR transmitter hardware (e.g., ESPHome infrared entities, Tuya Local IR blasters). These are the physical IR LEDs that send commands. Each emitter card shows its entity ID and a TX badge.
Receivers - Your IR receiver hardware. These feed captured signals into the Sniffer. Each receiver card shows its source integration and an RX badge.
Proxies - Hardware devices that have both TX and RX capabilities. A single ESPHome board with an IR LED and an IR receiver shows up here with both TX and RX badges.
The Sniffer Tab
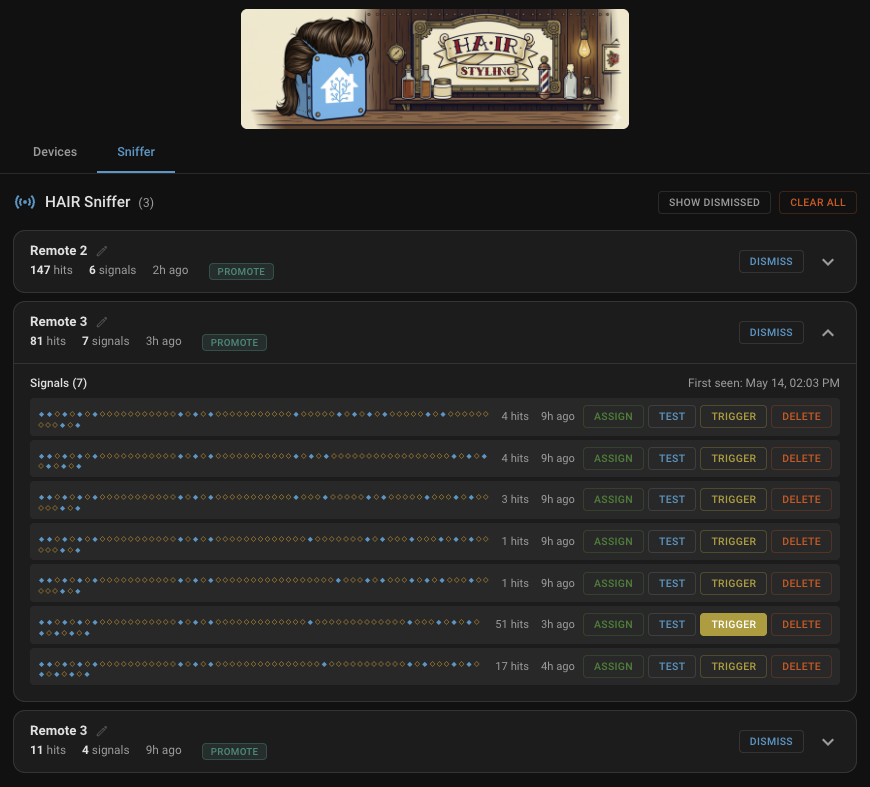
The Sniffer is a passive listener that shows every IR signal your receivers pick up. Signals are grouped by source device (identified by carrier frequency and preamble fingerprint) and displayed with hit counts, signal counts, and last-seen timestamps.
Each source device row can be expanded to show individual signals with their S/L diamond fingerprint. From here you can assign a signal directly to a HAIR device as a named command, or promote an unknown source device into a full HAIR device profile. Before promoting, click the pencil button on the source device row to give it a custom name -- otherwise the new device inherits the auto-generated source name (e.g., "Unknown Remote 1"). Setting the name first means the promoted device lands in your Devices tab already labeled correctly.
Devices already managed by HAIR are tagged with a "HAIR Device" badge. You can dismiss noisy sources (like a neighbor's remote leaking through a window) and bring them back later with the "Show Dismissed" toggle.
Adding a Device
There are two ways to add a device.
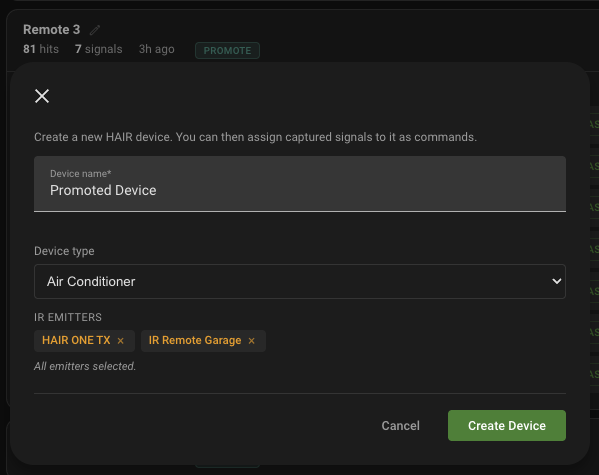
From scratch: Click the "Add Device" button in the tab bar on the Devices tab. Enter a name, pick a device type, and select which IR emitters should broadcast commands for this device. HAIR creates the device profile and the corresponding HA entities immediately.
From the Sniffer (promote an unknown source): When HAIR detects a remote it doesn't recognize, it appears in the Sniffer as an unknown source device. Click the pencil button on the source row to give it a custom name first, then promote it to a full HAIR device. Setting the name before promoting means your new device shows up in the Devices tab already labeled the way you want it, instead of carrying the auto-generated "Unknown Remote N" name forward. This path is ideal when you have the physical remote in hand and want to capture its signals first.
Learning Commands
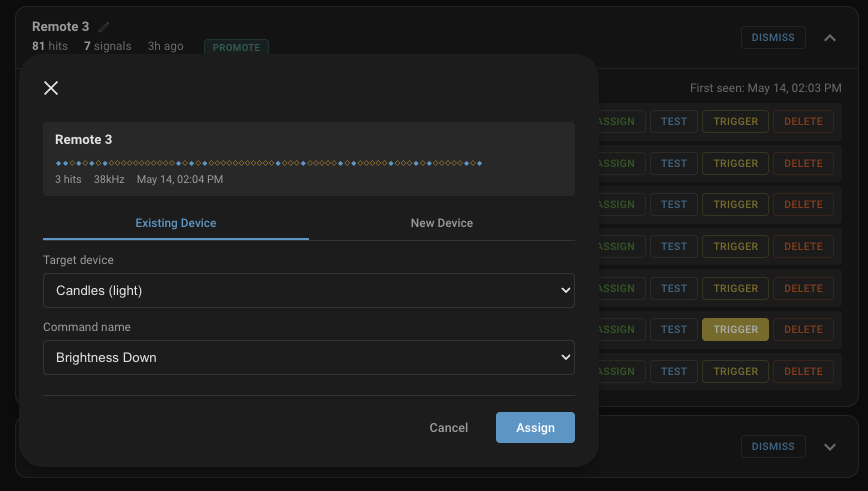
Navigate to the Sniffer tab and press buttons on your physical remote. HAIR captures each signal in real time. Expand the source device row, then click on a signal to assign it to one of your HAIR devices. Pick a command name from the device-type-aware template list (e.g., "Power On," "Volume Up," "Mode: Cool") or enter a custom name.
Action Mapping
After learning commands, open a device's detail view and click the "ACTIONS" badge on any command row. A popover shows all available actions for that device type. Pick an action to bind it to that command. For example, mapping "Power On" to the turn_on action means the HA media_player's power button will fire that IR command. Actions already mapped to other commands are shown with their current assignment so you can reassign with a single click.
Triggers
Triggers let you use incoming IR signals as automation triggers in Home Assistant. There are two ways to create a trigger.
From a device command: expand a device in the Devices tab and click the trigger button on any command row. This creates a trigger linked to that command's signal. If a trigger already exists for that command, the button opens the trigger in edit mode instead.
From the Sniffer: expand an unknown device and click the trigger button on any signal row. This creates a trigger from the raw signal fingerprint, which is useful for signals you want to react to without assigning them to a HAIR device.
Each trigger has a configurable "min hits" value (minimum button presses, 1 to 10) that controls how many times the signal must be received within a 5-second window before the trigger fires. Setting this to 2 or 3 is useful for preventing triggers from firing on stray or accidental presses.
Active triggers appear in the Triggers section at the bottom of the Devices tab. When a trigger fires, its card flashes with an amber glow animation. Each trigger creates an event entity (e.g., event.hair_triggers_tv_power) that you can use directly in HA's automation editor as a trigger condition.
Entity Platforms
Devices automatically get native HA entities based on their type:
| Type | HA Entity | Controls |
|---|---|---|
| Media Player | media_player |
Power, volume, mute, source, channels, navigation, transport |
| AC | climate |
HVAC modes, temperature presets, fan modes |
| Fan | fan |
Power, speed stepping, oscillate |
| Light | light |
On/off, brightness stepping |
| Switch | switch |
On/off |
| Screen | cover |
Open, close, stop |
| Other | remote |
Generic IR command sender |
Every device also gets a remote entity for sending arbitrary Pronto hex codes and a button entity for each learned command. The button entities give you one-tap access to any IR command from dashboards, automations, or scripts, regardless of device type.
Triggers create event entities under a shared "HAIR Triggers" device. Each trigger entity fires an ir_command_received event when its signal is detected, making it available as an automation trigger in HA's automation editor.
Entity features are driven by explicit action mappings. A media_player only exposes volume control if you map commands to the volume actions. This keeps your entities clean and avoids exposing features your remote doesn't support.
How It Works
HAIR sits between you and HA's IR platform. It does not replace your IR hardware integrations (ESPHome, Tuya Local, Broadlink, etc.). It complements them by providing the admin layer those integrations lack.
Capture (RX)
HAIR captures IR signals via ESPHome devices with the remote_receiver component. This is a legacy event-bus bridge today (see ESPHome Receiver Setup above for the YAML stub). When HA's native IR receive entities ship (expected 2026.6 or 2026.7), HAIR will migrate users automatically and the YAML bridge will no longer be needed.
Transmit (TX)
HAIR transmits IR signals via any integration that exposes HA's native infrared platform. Currently ESPHome, Tuya Local, Broadlink, SMLIGHT, and other integrations that adopted the platform.
Signal Fingerprinting
Captured IR signals are fingerprinted using S/L (short/long) pulse-duration classification. Each pulse in the signal is classified as short or long, producing a pattern that uniquely identifies the signal regardless of minor timing jitter between presses. In the UI, these patterns are shown as two-tone diamond sequences for quick visual identification.
S/L fingerprinting covers all major consumer IR protocols including NEC, Samsung, JVC, LG, Sony, and RC-5/RC-6. Repeat frames (sent while a button is held) are filtered automatically. Signals are grouped by source device using carrier frequency and preamble analysis, so the Sniffer knows which remote a signal came from without needing to decode the specific protocol.
Architecture
Remote Control
      |
  IR Receiver (ESPHome remote_receiver)        <-- RX path: ESPHome only
      |
  HA Event Bus (esphome.remote_received)
      |
  HAIR Signal Monitor --> Signal Store (fingerprint + dedup)
      |                         |
      |                   Trigger Manager --> Event Entities (HA automations)
      |
  HAIR Admin Panel (Sniffer view)
      |
  Assign to Device --> Device Manager --> Entity Factory
      |
  HA Entities (media_player, climate, fan, light, switch, cover, remote, button)
      |
  HA infrared Platform (infrared.send_command) <-- TX path: any platform integration
      |
  IR Emitter Hardware (ESPHome, Tuya Local, Broadlink, etc.)
Comments