Notify Studio
Build, test, organise, template, audit, and diagnose rich Home Assistant Companion notifications from one admin-only sidebar panel.
[!WARNING] Notify Studio is under active development. Review generated YAML before using it in a live automation or script, and take a Home Assistant backup before installing an update.
v0.1.26 fixes Save Automation across Chrome and Firefox by saving validated UI-managed automations through Notify Studio's administrator-only WebSocket API rather than relying on a browser-only authentication helper.
What it does
Notify Studio brings the fragmented parts of rich Companion notifications into a single Home Assistant panel. It uses legacy notify.mobile_app_<device> services for the Companion-specific payload fields that standard notify entities do not expose.
| Section | Purpose |
|---|---|
| Notifications | Audit notification calls found in merged YAML, organise them with custom Notify Studio categories/areas, bulk-toggle groups, and review recent push activity. |
| Compose | Build a platform-aware notification, preview Jinja content, send a test, save a template, generate copy-ready YAML, or create a UI-managed automation. |
| Templates | Create, edit, reuse, and delete saved notification drafts stored inside Home Assistant. |
| Logs | Review recent Notify Studio actions, warnings, and errors, including Run test outcomes. |
Screenshot 1
Screenshot 2
Features
- Dynamic discovery of registered Home Assistant Companion mobile-app services.
- Android and Apple-specific composer options, shown only for the selected platform.
- Live Jinja preview for notification titles and messages.
- Safe test sends restricted to discovered Companion notifier services.
- Reusable templates with immediate loading from the Composer dropdown.
- Actionable-notification buttons for scripts, Home Assistant actions, URIs, text replies, and custom events.
- Generated YAML for notification actions and matching
mobile_app_notification_actionhandlers where required. - Save generated notification actions as new UI-managed automations, then open Home Assistant’s Automation Editor to add triggers and conditions.
- Merged-YAML auditing across automations, scripts, alerts, and nested action blocks.
- Filtering by source type, Home Assistant category, Home Assistant label, notify device, and Notify Studio custom group.
- Per-instance custom categories and areas for notification sources, separate from Home Assistant's own registries.
- Responsive quick-control favourites: pin bulk or individual category/area controls with stars, keep one row visible by default, and expand for the full control list.
- Favourite choices are stored locally per Home Assistant instance. A narrower desktop temporarily shows the controls that fit without removing saved favourites; they reappear when space is available again.
- On mobile, up to seven favourite controls are kept in one swipeable horizontal row.
- Runtime enable/disable controls for matching automation entities and confirmed test runs for automations and scripts.
- A separate recent-activity column for notification-related automations and scripts.
- In-memory operational logs for test sends, YAML generation, source scans, templates, custom-group activity, run-test requests, warnings, and backend errors.
- No browser-stored access token. The panel uses Home Assistant's authenticated WebSocket connection.
Requirements
- Home Assistant 2026.5.0 or newer
- HACS
- At least one Home Assistant Companion App mobile device for notification composition and test sends
- A Home Assistant administrator account
Installation
HACS custom repository
Open HACS in Home Assistant.
Open the three-dot menu and choose Custom repositories.
Add this repository URL:
https://github.com/pqpxo/ha-notify-studioSelect Integration as the category, then add the repository.
Search for Notify Studio in HACS and select Download.
Restart Home Assistant.
Go to Settings → Devices & services → Add integration.
Add Notify Studio, then open it from the Home Assistant sidebar.
Manual installation
Copy custom_components/notify_studio to:
config/custom_components/notify_studio/
Restart Home Assistant, then add the integration through Settings → Devices & services.
Using Notify Studio
Compose a notification
- Open Compose.
- Select a Companion App target.
- Enter the title, message, tag, image, URL, and any platform-specific fields required.
- Select Send test to validate and deliver the notification.
- Select Generate YAML to create a notification action and any matching handler automation.
- In Preview and YAML, enter an optional automation name and select Save Automation to create a UI-managed automation and open it in the native editor.
The right-hand panel renders the title/message as you type and shows the generated YAML.
Save a generated automation
After selecting Generate YAML, use Save Automation in the Preview and YAML panel. Notify Studio creates a new UI-managed automation with the generated notification action, then opens Home Assistant’s Automation Editor. Add or review the trigger and optional conditions before enabling it.
If the notification includes actionable buttons that need an event handler, Notify Studio also creates a separate handler automation. This is required because Companion action presses arrive as independent mobile_app_notification_action events.
[!NOTE] This creates Home Assistant UI-managed automations. Home Assistant manages
automations.yamlfor UI-created automations; Notify Studio does not directly edit YAML files or package/include files.
Save and reuse a template
- Build a notification in Compose.
- Select Save Template.
- Give it a name and optional description in Templates.
- Return to Compose and select it from the Template dropdown. It loads immediately.
Templates are kept in Notify Studio's Home Assistant storage. They do not alter package YAML or existing automation files.
Organise notification sources with custom categories and areas
Open Notifications, then select Manage groups.
- Create a custom category or area such as
Security,Morning routines, orUpstairs. - Use Select entities beside the relevant group's Rename and Delete controls.
- Tick the source cards you want to include, then choose Save entities in the Manage groups panel.
- The unified control panel shows saved source members and an overall automation toggle for every group.
- Use individual member controls or the overall control to enable or disable assigned automation entities.
Custom groups are intentionally separate from Home Assistant's native categories, areas, and labels:
- They are stored per Home Assistant instance in Notify Studio storage.
- They do not rename or change any Home Assistant entity.
- They can include automation, script, or alert sources.
- Bulk toggles only affect assigned automation entities. Scripts and alerts are never enabled or disabled by the group control.
Add actionable notification buttons
Enable Actionable notification in Compose and configure one or more buttons.
| Button type | Result |
|---|---|
| Run script | Generates a handler that calls the selected Home Assistant script. |
| Run Home Assistant action | Generates a handler that calls the chosen action with optional JSON data. |
| Open URI / dashboard | Opens a URI, deep link, or Lovelace route directly on the mobile device. |
| Ask for text reply | Generates a handler that exposes trigger.event.data.reply_text. |
| Send event only | Generates a safe starter handler for you to extend. |
Android supports up to three actionable notification buttons. Platform support and permissions still apply, so review generated YAML before production use.
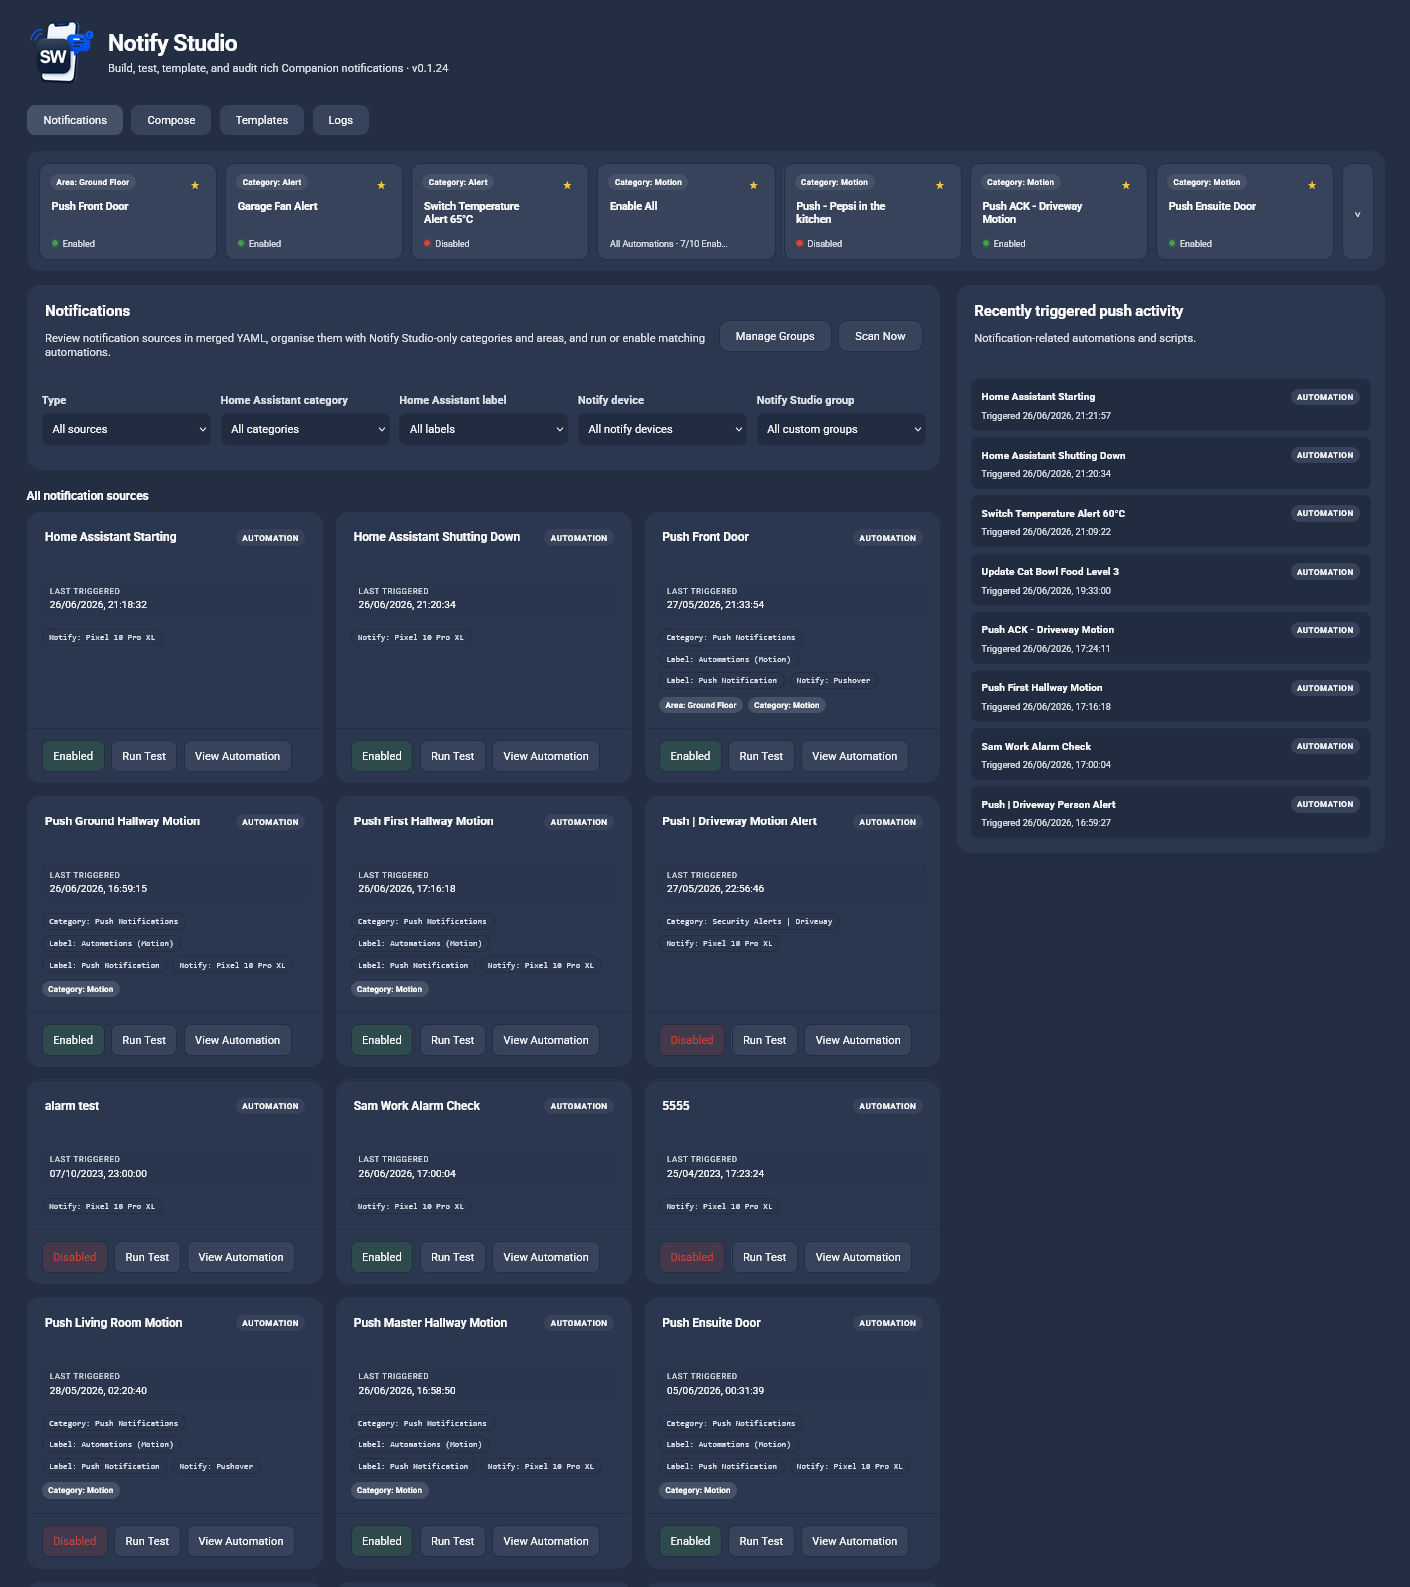
Audit notification sources
Open Notifications to scan merged Home Assistant YAML. The left column contains filters and notification source cards. The right column contains Recently triggered push activity for notification-related automations and scripts.
For matching runtime entities, a source card can display:
- Last triggered time
- Home Assistant category, labels, and discovered notify devices
- Notify Studio custom-category and custom-area assignments
- Enable/disable control for automations
- A confirmed Run test action
- Selection checkboxes when a custom category or area is in entity-selection mode
- A confirmed editor shortcut for the matching automation or script
[!NOTE] The static audit covers merged YAML configuration, including packages and supported include files. Sources created only outside YAML may not be returned by the scanner.
Diagnose Run test problems
Open Logs after using a Run test button. Notify Studio records whether Home Assistant accepted, blocked, or rejected the request.
- Automation disabled: enable the automation first.
- Already running in single mode: wait for the current run to finish before running another test.
- Run test queued: Home Assistant accepted the request. For automations, top-level conditions are deliberately bypassed so notification actions can be tested reliably.
- Service/action error after queueing: inspect the automation trace or Home Assistant system logs. The app can confirm the request was queued but cannot safely wait for long-running automations to finish.
The Logs page keeps the latest 250 application events in memory and clears when Home Assistant restarts. It does not copy the entire Home Assistant system log and it does not record notification payload contents.
Platform notes
Android
Notify Studio exposes Android-compatible options including channel, importance, priority, colour, icon, timeout, sticky behaviour, persistent notifications, and Android URI actions.
Persistent notifications require a tag. Notify Studio supplies an editable tag automatically when Persistent notification is enabled and the Tag field is empty.
Apple devices
Apple-specific options include subtitle, sound, badge, interruption level, and thread ID. Critical and time-sensitive notification behaviour depends on Companion App permissions and device settings.
Security and safety
- All Notify Studio WebSocket commands require an administrator account.
- Test sends and run-test controls can trigger real notifications, automations, scripts, and device actions.
- Custom group bulk toggles can enable or disable several automations at once, and always ask for confirmation.
- Test sends are restricted to discovered
notify.mobile_app_*services. - Run test deliberately bypasses top-level automation conditions. It does not alter the automation configuration.
- Review all generated YAML, especially actionable-notification handlers that call scripts or Home Assistant actions.
Development
notify-studio/
├── custom_components/notify_studio/
│   ├── brand/                 # Integration and README logo assets
│   ├── frontend/              # Compiled panel bundle committed for HACS
│   ├── custom_group_store.py  # Custom Notify Studio category/area storage
│   ├── log_store.py           # Bounded in-memory application log
│   ├── notification_schema.py # Payload validation and YAML generation
│   ├── notify_scanner.py      # Merged-YAML notification scanner
│   ├── template_store.py      # Saved notification template storage
│   └── websocket_api.py       # Admin-only panel API
├── panel-src/                 # React, TypeScript, and Vite source
└── .github/workflows/         # HACS and Hassfest validation
Build the panel
cd panel-src
npm install
npm run typecheck
npm run build
The compiled module is written to:
custom_components/notify_studio/frontend/notify-studio-panel.js
Commit that bundle with every frontend source change, as HACS users do not run a build step.
Versioning and HACS releases
Use GitHub branches and pull requests for changes. After merging a version into main, publish a GitHub Release such as v0.1.26. HACS uses published releases to offer version selection and rollback.
See HACS_RELEASE_WORKFLOW.md for the release checklist.
Comments